
No matter how long you’ve been doing stained glass, gaps happen. With that in mind, let’s talk about how to fix gaps in your stained glass.
But first, To Gap or Not To Gap? That is the question.
Should you have gaps in between your stained glass pieces?
You’ll find some who say no and some who say yes. The correct answer? Yup yup yup yup yup. Buuuuuuuuuut….before ya go skipping & jumping away through your glass gaps, there’s some stuff ya need to know!
Hang here with me and Imma tell ya why you need ‘em, and of course, we’ll dive into how big a gap is ok, & how to fix ‘em too!
Table of Contents
Why do you need a gap in your glass?
In a word….structure!
When we’re working with copper foil & solder, we’re essentially building our own came. In came, we use U came for the outside of project and H came for between pieces.
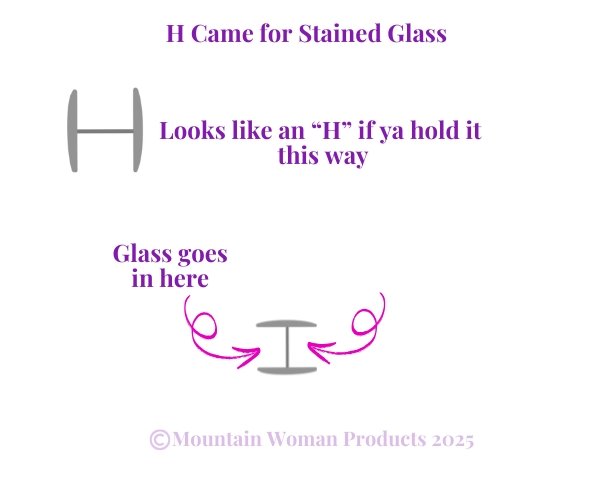
The middle part of the H is what connects the front and back of your project.
How does this relate to structure?
Let’s elaborate on the H came thang with…
The I Beam vs a Sandwich
With no gap, you’re making a solder sandwich. Solder on the front, solder on the back, and the only thing between your pieces is some mostly unconnected, maybe slightly tinned in a few spots, copper foil tape (aka, nuthin’ much).
When you have a bit of a gap, you’re making your own H came (or an I Beam if your familiar with building or bridge construction). Overall, this means you’re connecting the front and back of your project together in lots of spots.

Which is stronger? The project that’s connected front to back in lotsa spots with I Beams? Orrrrrrrrr….a bunch of glass in a solder sandwich?
The beam. Definitely the beam.
Now that we got that down, let’s talk about…
The Importance of Gap Size
Too small of a gap is like not having one at all. We already know what happens then.
Too big, and you’ll be stuck in the never ending solder-drippping-through-the-this-side-oh-crop-now-I-hafta-fix-it-and-oh-crap-now-it-melted-through-the-other-side-oh-crap-here-we-go-again-clink!!!-nooooooo-heat-fracture-yarrrrrrrrrrgh-I-hate-evvvvverything trap.

Aaaaand if that doesn’t happen, at very least your solder line width is going to be inconsistent and that’ll make your piece look meh.
We don’t like meh.
We like freakin’ fabulous up in herrr.
So how do you know…
What size gap you should have between your glass? (Cuz size does matter)
Ya get some leeway here, but you’re going to wanna be between too little & too much. (I know…that was suuuuper specific).
You need enough to accommodate your two pieces of foil & some space for solder.
Ideally, about the width of a sewing pin.
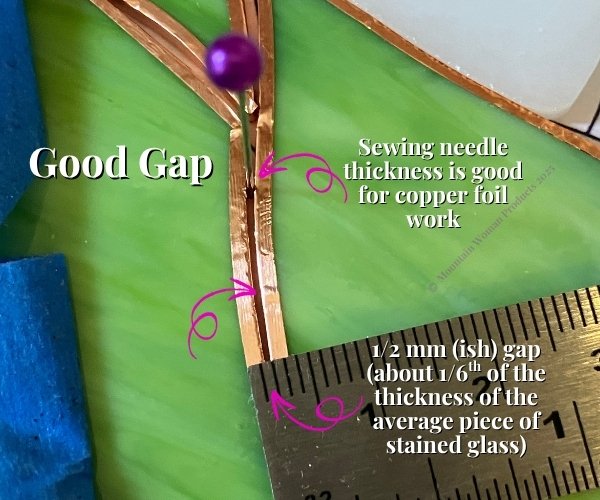
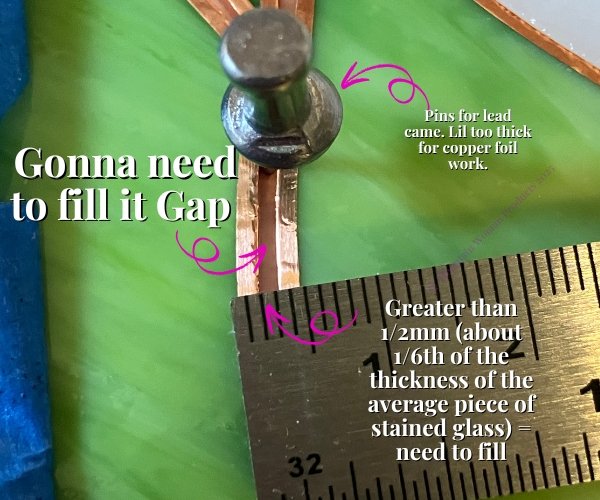
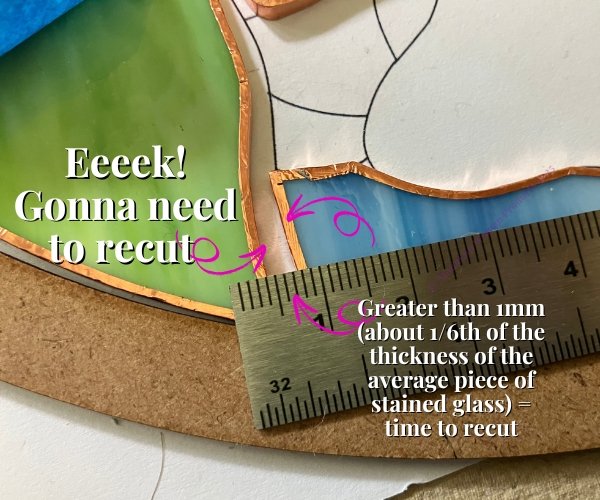
So right about 1/2 mm (ish).
That’s enough to create your connecting I beam/pretend H came situation, but not so much that you play the leak through game.
Great!
But we’re not in an ideal world here and sometimes, you end up with a bigger gap than that and you don’t have more of the glass to cut a new piece and/or you don’t wanna cut a new piece cuz ya lazy or cuz you don’t want to waste the glass cuz glass is freakin’ expensive.
Fear not my glass hoarding, lazy glassin’, frugal friend! Imma show you…
How to Fix Gaps In Your Stained Glass & Prevent Solder From Leaking Through
Everyone has different ways they like to do gap fixes. But let’s talk about the pros & cons of each so you can decide which one you like the best.
We have four ways.
Let’s start with my least favorite:
Tape to Prevent Leak Through
Tape one side off, solder. Let it cool. Flip to the other side and don’t freakin’ stay on there long! Why is it my least fav? Cuz the solder in between the glass does heat up quickly and it’s pretty easy to end up screwing up your finished side.
Also if we melt tooooooooo much (not ridiculously likely, but possible) then you end up with adhesive melting into your solder & then you get contaminated solder that ends up either pitted or lumpy.
If you’re really fast at soldering, and you don’t have many connection points going on in that area, you can get away with it, but if not, ugh.
Next up we have:
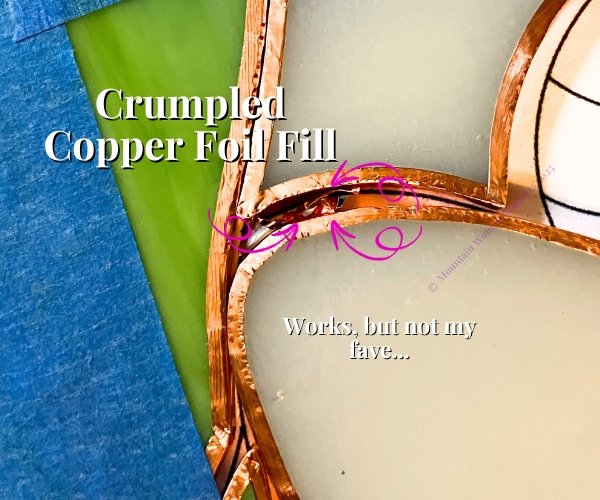
Filling Glass Gaps with Crumpled Copper Foil Tape
This does work. And it’s kinda nice cuz you can save your foil scraps & shove as much in there as ya want. Buuuuuut…
It has adhesive on it which weakens your I beam/H came a bit & can bubble up through the face of your solder line. Also, you may end up with little air gaps between your crumples which again, weakens the I beam/H came thing.
My second favorite way:
Fixing Gaps with Tinned Copper Wire
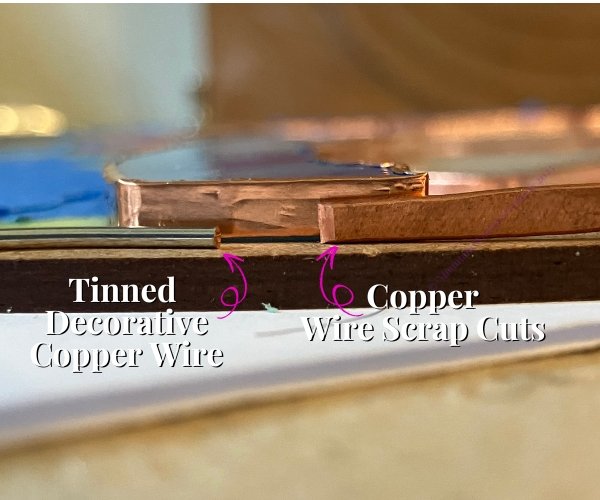
You probably already have it on hand & if you save your cast offs & end cuts from other wirework, you’ll have lotsa pieces to chuck in the gap to fill. You’ll need to stack it cuz it’s thin.
The only real problem is that cuz it’s so thin and little, it likes to move out of place and attach itself to your iron & poke up and you kinda have to fight with it sometimes to stay in place. Slide your iron off to the side while tinning instead of lifting straight up to help keep them in place.
Which brings us to my very favorite way to fill gaps:
Using Copper wire cuts to fill stained glass gaps
It’s comparatively cheap (especially if you can sweet talk your local electrician for scraps, but still pretty dang cheap if ya get it in my shop), it’s thick enough to take up a lotta gap space, but still leaves a little bit of room for solder to get around it helping form our I beam/H came situation, and if you need it to be thinner, you can hammer it flat to fit.

Trimming Your Foil Around Glass Gaps
Now that you’re all filled in, you’re going to need to trim your foil so that your gappy line isn’t wider than the rest of your solder lines.



(Btw, you can get my Weirdo Warbler Bird Plant Stake Pattern & tutorial here for FREE in the Peace, Love, & Stained Glass Community😁)
This is why I highly recommend beginners start out with ¼” foil. Cuz there’s more available foil for trimming if ya end up with a gap (or if you didn’t get your foil very even…that’s for another post though).
Bigger foil gives you more room to work with if ya screw up.
For straight lines, I highly recommend using a teeny baby ruler like this one:


Tips for soldering after you filled your gap with foil, tinned wire, or copper cuts:
Personally, I like tinning first before soldering all the time cuz more solder gets down between your pieces & since solder likes sticking to solder, it makes for smoother lines.
But maybe you don’t normally do that.
Do it this time!😁
And go slowly.
You want to watch that solder sinking down into the gap a little bit so it’s going around whatever filler you’re using.
Do that on both sides. Let it cool and then you’re free to lay down your solder lines as normal.
Do gaps matter in something small like a suncatcher?
Well….like most everything stained glass…it’s a nuanced answer.
A small suncatcher with only a couple of pieces? Heck yeah! You need all the structure help you can get.
A small one with lotsa pieces? Not as much. Buuuuut….
That’s also going to depend on how well you solder & edge bead (nice raised, domed beads), how many pieces, and foil thickness.
The bottom line?
It’s always better to overengineer than underengineer. Cuz if you do a little too much, nothing bad happens. Do a little too little, and Boom! Crash!
If you have any questions about anything in stained glass, I’m here for ya!
Peace, Love, & Stained Glass,
-Shannie
Want to make freakin’ fantastic glass art?
Join my newsletter and get a FREE Beginner’s Guide to Stained Glass with a 5 day Stained Glass Jump Start, FREE patterns, & super duper helpful tips in your inbox.

